

 Memberships
 Ride Information

CHOOSING A TOURING BIKE FOR THE ROAD --
By Larry Diskin, former Events Coordinator for Adventure Cycling Tours
We all have different needs and goals. No bike is perfect for everybody. In this article, I aim to give you objective information about various bikes so that you can decide what is best for you. If you want to own only one bike and use it for a various purposes, there will be some compromise involved. However, if you are like most avid cyclists, you probably have more than one bike and are therefore better prepared for a variety of conditions.
The first step before buying a new bike is to make a list of your needs. Think realistically about how you will use the bike. What type of riding are you planning to do? Are you more interested in comfort or speed? How far will your average ride be? What are your goals (fitness, seeing new things, thrill of riding, etc.)? Who are you planning to ride with and what is the norm in their group? What is the terrain where you plan to ride most? What is your budget?
LOOKING TO DO SOME LOADED TOURING?
There are certain qualities that make a bike appropriate for loaded touring. Although different styles of bikes can be used, the bike you choose should have the following qualities:
Wheels -- The primary source of breakdowns on a bicycle tour are wheel-related. Professionally hand-built wheels tend to be the most reliable. More spokes usually makes stronger wheels. I recommend a minimum of 36 spokes and a three-cross lacing pattern. Many new bikes come with high-tech, lightweight wheels that have fewer spokes, unconventional lacing patterns, and hard-to-find spokes or parts. These wheels favor weight savings, compromise durability, and are not ideal for loaded touring. Aluminum rims of 22 millimeters or wider offer strength, light weight, and a good surf ace for braking. They also accommodate wider tires (1-1/4 to 1-3/8 inch) that better absorb road shock and bumps.
Frame -- Durable frames can be made of a variety of materials, including aluminum, steel, and titanium. There is a lot of talk about what material is best, and the fact is, frame construction plays a bigger role in durability than does the material. Look for a frame that is designed to be durable rather than lightweight. Your frame should have clearance for tires at least 28mm wide and fenders. If you are planning to use panniers, the frame should ideally have brazed-on rack mounts. To determine your correct touring frame size, simply straddle the bicycle with your feet flat on floor, and allow between 1-1/2 and 2-1/2 inches of clearance between the top tube and your crotch.
Gears -- Gears are measured in gear inches; your bike shop can explain how these are computed. You can also use Sheldon Brown's gear calculator (http://www.sheldonbrown.com/gears/). For loaded touring, a top gear of 95 inches is adequate, and a 22-inch low gear will serve you well on steep climbs. To quickly check your own bike, or when shopping for a new one, look for 24 to 28 teeth on the small chainring (attached to the pedal crank arm), and 30 to 34 teeth on the largest sprocket of the freewheel. The smaller the number of teeth on the small chainring and the greater the number of teeth on the biggest freewheel sprocket, the easier it will be to pedal uphill.
FRAME STYLE OPTIONS
Following is an overview of the strengths and weaknesses of five different styles of bikes.
Traditional Road Touring
Characteristics: Drop handlebars, looks like a lot like a road racing bike but has the following features that make it more appropriate for loaded touring: longer whe elbase for stability, heavier frame for strength, frame clearance to accommodate fenders and wider tires, brazed-on rack mounts on the frame and fork, triple chainring, and V-style or cantilever brakes for added power. Typical wheel size: 700C.
Pros: Classic choice for loaded touring; long-distance comfort; positions body aerodynamically; good mix of speed, comfort, and durability.
Cons: Riding position may be awkward if you are new to bicycling; may be uncomfortable or need modification for people who suffer chronic back or neck pain.
Summary: Designed to bear the extra weight of long-distance loaded touring but also makes a decent bike for casual road riding when you are not carrying a load.
Sport Touring
Characterist ics: Often identical to road racing bikes except for the fact that they have a triple chainring. Typical wheel size: 700C.
Pros: Great for long distances at maximum speeds; positions body aerodynamically; performance-oriented; lightweight.
Cons: Often have no frame clearance for fenders or tires wider than 28mm; sacrifice durability in exchange for weight savings; may be uncomfortable for people with chronic back or neck problems.
Summary: These bikes were introduced to fill a niche. They are lightweight and fast handling, but the addition of the triple chainring provides low gearing so that the average cyclist can climb extended hills. These bikes are great for supported touring in hilly terrain but are not ideal for loaded touring.
Hybrid
Characteristics: A combination of a mountain bike and a road bike. Flat or slightly raised straight handlebars. Triple chainring. Usually come with medium width road tires (32-40mm). Typically has rack mounts and enough clearance for fenders. Typical wheel size: 700C.
Pros: Comfortable; upright riding position; great for cruising but can also go the distance; a bit faster than a mountain bike.
Cons: Upright position is not aerodynamic; does not excel in any one category.
Summary: Good for someone new to cycling or someone who likes the upright riding position and added stability of wider tires. Best for paved roads, okay on dirt roads, not great for single-track. Quite versatile overall.
Recumbent
Characteristics: Rider sits on a chair that has a back, with his or her legs out in front rather than underneath. There are many different designs. Wheel and handlebar positions vary. Typical wheel size: varies among models and manufacturers.
Pros: Most comfortable; can be very aerodynamic (especially with a fairing option); great for people with chronic back, neck, or arm pain.
Cons: Climbing is less efficient; unique designs can create more complex mechanics and hard-to-find parts; rider often sits very close to the ground and is harder for drivers to see.
Summary: Recumbents are growing in popularity largely due to their comfort. There are many different designs; some are suitable for loaded touring and some are not. Check with a recumben t specialist to find one to suit you.
Using this information, advice from your fellow cyclists and help from the salespeople at your local bike shop, you should be able to find the perfect bike to fit your needs.
Social Survival: How to make friends, have fun, and get the help you need on the road --
By Larry Diskin, former Events Coordinator for Adventure Cycling Tours
We often write about selecting the proper gear. We recommend exotic locations, give you the maps, and lead you on three-month expeditions. But rarely do we share the secrets of social survival, tricks of the trade so to speak. Adventure Cycling has been training people how to lead bicycle tours for more than 30 years. Our Leadership Training Course is the training and selection process for Adventure Cycling tour leaders. But it doubles as a forum for exposing future leaders to social and cultural issues that bicycle tourists encounter, and sometimes create, during a tour. Here are a few concepts to keep in mind that will help you have a positive experience.
SHARE THE ROAD
It's a two-way street. Many motorists feel that bicycles do not belong on the road. A few irresponsible cyclists can do a great deal to perpetuate those feelings. Riding two abreast and failing to obey traffic laws are common no-nos that can create lasting negative impressions. Try to look at truckers as your ally. Despite what some believe, many truckers are genuinely concerned about cyclists. Treat them with respect; they are trying to make a living.
Truckers can be a reliable source of road condition information and emergency assistance. They sometimes look out for your safety by radioing other truckers to pass along your whereabouts, but they will also radio to warn other truckers about bad riding practices or inappropriate actions such as "flipping the bird," which could easily make the rest of your day miserable.
EMBRACE CULTURAL DIFFERENCES
There are potential conflicts between cyclists who are on vacation and the people who live and work in their own real world along your cycle touring route. Most of Adventure Cycling's routes pass through rural areas, where life is different from life in metropolitan areas. Tourists have a responsibility to be aware of and respect differences. Those who have a sincere interest in understanding the local people will leave the best impression. If you want everything to be like it is at home, stay home.
BE CONSCIENTIOUS
Keep in mind that you are an ambassador for all bicyclists. You'll stand out everywhere you go and your actions will be associated with other bicyclists in the future. Cyclists are often guilty of behaviors that can result in justified negative reactions. Here are a few common pitfalls to avoid: - Do not block sidewalks or entryways with bodies or bikes. - Do not occupy a cafe for hours over a cup of coffee. - Do not clean your bike in campground or motel restrooms. - Always ask before using restrooms and always make a small purchase if you use the bathroom at a store.
YOUR APPEARANCE IS IMPORTANT
Cyclists are accustomed to the appearance of other cyclists. It may seem status quo to you, but tight bright lycra, aerodynamic helmets, bike shoes and sports glasses can make you appear quite strange to people who are not familiar with the sport. Take off your helmet and glasses. Show strangers your eyes and you'll look a lot friendlier. Tight lycra bike shorts can be more revealing than some folks are comfortable with. If you wear those, keep a lightweight pair of baggy shorts accessible and slip them on over your tights before you go inside cafes and grocery stores.
DON'T BE CHEAP
You are an ambassador for all things bike. Tipping is very important. You may never be there again but tipping definitely leaves an impression that will affect others in the future.
FOLLOW UP
Send a post card to people you meet along the way. Even a few to people you briefly met. It will be appreciated and is likely to find a home on their refrigerator.
HOW TO TREAT A BIKE SHOP
Inevitably, you will go into a bike shop for some kind of assistance during your tour. Your behavior can dramatically affect the service you receive.
In many cases, bike shops are in business because the owner is passionate about bicycling. But remember that part of that statement is "bike shops are in business." And in an age of Internet sales, mail order madness, and price haggling, many shops struggle to keep the doors open.
If you are going to ask for help from a bike shop, make it worth their while. Some shops have a do-it-yourself area where you can use tools and work on your bike. Even if this area is provided as a free service, make a small purchase to express your appreciation.
Shops without do-it-yourself areas are more prevalent, and there are many valid reasons that some of them do not loan tools. If they do loan you a tool, take your bike to an out-of-the-way area of the store to work on it. If you have to ask how to use the tool or how to accomplish the task at hand, you really should just pay the bike shop to do it for you. That is, after all, why they are in business.
Hoping for on-the-spot service? Bike shops are often very busy in the summer months. The fact that you are away from home on a tour may not make you any more important to the bike shop than any of their usual customers.
It's not that they are against touring, or are not interested in your business, but rather a matter of having to prioritize. Bike shops rely on their repeat patrons for support and you may not be perceived as one of those. They need to make sure the regulars get their bikes back on time in order to insure that those customers come back next time.
If you are hoping for immediate service, walk in with a smile, a relaxed attitude and toting a six-pack of cold microbrew. Make sure you act like somebody they care to help, avoid coming across as demanding or pushy. When the time comes, ask for help in a way that allows them to feel good about helping you. Offer the person you are speaking with a beer. (Even if they don't drink beer, they'll appreciate the gesture.) Remember, the bike is your main tool on this adventure. If it breaks down, smile and look as it as part of the adventure. Be patient ... good things often happen when you least expect it.
HOW TO BOX AND SHIP YOUR TWO-WHEELED DREAM MACHINE --
By Adventure Cycling’s Tours Department
Although airlines, bus companies, and railways are generally accustomed to transporting bicycles, there is always a risk of damage. Proper boxing can minimize the risk of damage or loss. You must anticipate the possibility that your bike will be dropped, stacked in cargo bins, or otherwise handled roughly once it leaves your sight. Don't travel with your bicycle unless it is boxed! Some airlines have boxes available. Some airlines require several days' advance notice that you'll be traveling with a bicycle. Give this notice directly to the counter where you will be departing.
You can often get used boxes from bicycle shops, especially if you call a few days ahead. While you're at the bicycle shop, get two boxes (for each bike you want to ship), preferably one slightly larger than the other. A single box can be modified to protect your bicycle fairly well, but one slipped inside another to form a double-walled container, braced internally, will give your bike better protection and give you greater peace of mind.
It takes time to box a bicycle, especially if it's your first try, so don't wait until a half-hour before your flight is scheduled to depart to begin working on it. You'll need a pocket knife, some extra strips of cardboard, some scrap wood, tape (filament or duct tape), and some light rope, twine, or stout cord.
Disassembly
- Shift the gears so that the cables are slack.
- Deflate the tires halfway for more shock-absorbing capability.
- Remove seat and post as a unit.
- Remove the front wheel. Cut a small block of wood to fit between the front-fork dropouts, and tape it in place. This will help prevent the fork blades from being bent.
- Remove the brake cables from the brake levers. If your bicycle has a very long wheelbase, it may help to completely remove the front brake so the fork can be rotated 180 degrees.
- Remove the handlebars and stem as a unit by loosening the stem bolt two full turns. Then, protecting the bolt with scrap wood, hammer to loosen the internal wedge, and pull the stem out of the steering tube. Retighten the stem bolt to avoid losing the wedge.
- Remove the pedals. Remember that the left pedal is a left-hand thread; the right pedal is a standard right-hand thread.
- Tie or tape the front wheel to the right side of the frame, padding between the wheel and the frame with cardboard. Turn the crank arms parallel with the box bottom and tape in place.
- Make two 6-inch square "washers" of several layers of cardboard with a center hole. Make them thick enough to prevent the front-wheel axle or quick-release end from puncturing the box. Tape these in place over the exposed front axle end and the end of the rear axle opposite the derailleur.
- Unbolt the rear derailleur (but don't disconnect the cable) and tape it to the rear wheel spokes below its normal position so it doesn't stick out past the frame. Pad the derailleur with a roll of cardboard also taped in place.
- Cradle the handlebars and stem over the top tube or around the fork and head tube if space permits.
Preparing the Box
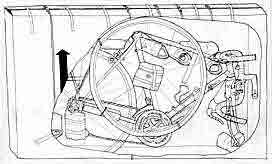
- Cut five pieces of cardboard, each about one foot in length, and wide enough to fit snugly across the inside width of your box. Form tightly rolled tubes and fit them inside the box. These tubes will absorb forces from the sides and prevent the box walls from collapsing into the bicycle.
- Place one tube inside the box near the lower end of the front fork. Place two tubes, slightly flattened to fit, through the rear wheel and tape them in place. Place other tubes where the top and down tubes meet, through the front-wheel spokes, and below the top tube, toward the front of the bike. Tape each tube in place.
- Lower the bicycle into the box, and add cardboard pads wherever any remaining sharp or fragile parts might contact the box. Anchor the cross-bracing cardboard tubes further by punching holes in the box sides to match the tube centers, and securing the tubes with tape, rope, or both. The rope can also be padded and used as convenient carrying handles.
- Wrap the saddle, pedals, and other parts in newspaper or cloth and secure them inside the box. You might also want to place the tools you'll need to reassemble the bike in an easily retrievable bag inside the box.
- Seal the box with tape, and clearly label it with your name, destination, flight number, and home return address.
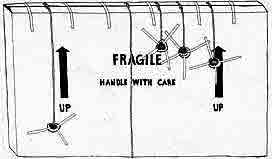
In this illustration, holes have been punched corresponding with the cardboard tubes which will protect the bike against side loads. The tubes have then been held in place with tape. Finally, rope acts as both support and temporary carrying handles.
Remember, on most airlines you will have to sign a waiver which will remove the airline from any responsibility for damage to your bicycle. It is to your benefit to spend some time carefully packing your bike. It's no fun to get to the trailhead of your long-awaited tour only to find your bicycle has been damaged.
This article may be reprinted in your club newsletter or on your club website. Please include the following credit line: Written by Adventure Cycling Association’s Tours Department. For all of your bicycle touring needs, visit www.adventurecycling.org.
 IN CASE OF AN EMERGENCY --
Many of us bike on our own all the time, several dozen miles in a stint, and never think twice about it. We definitely don’t want to spend all of our time worrying about what “could” happen. If we did that, we might never get on our bikes again. But, it is important to plan for an emergency, so that if something does go wrong, you are prepared. Last fall, the Portland Wheelmen Touring Club included a sheet of these Emergency Contact Cards in their newsletter. These are a great, low cost option that cyclists can carry in their handlebar bag or jersey pocket. This information will be helpful and even critical if you are ever in an accident and cannot communicate for yourself. You will also want to include any allergies, health issues or prescriptions you take. You may even want to laminate them for longer wear.
Another option is the RoadID. These durable metal tags can be engraved with up to 6 lines of information and come in various styles that attach to your wrist, ankle, shoe and more. You can go to www.RoadId.com for more information. Individual members of Adventure Cycling Association can receive a 10% discount when ordering from RoadID. Members will need to contact us to get the promotional code before ordering.
So the next time you hit the open road for a nice solo ride, take along a little peace of mind.
 TOUR PLANNING BASICS -- By Larry Diskin
Here is a brief introduction to bicycle touring for people that have not yet done it. I can't teach you everything there is to know about bicycle touring in one article, but I can answer some of the common questions beginners often ask and provide some tips to steer you towards more information.
WHAT TYPES OF PEOPLE GO ON A BICYCLE TOUR?
Bicycle touring is an activity that appeals to a broad spectrum of people and there are many ways to go about it. I know of adults well into their seventies and children in their teens that have ridden all the way across America. It can be done individually, with friends, or with a commercial tour operator. People of all ages, from all backgrounds, all around the world, choose the bicycle as their favorite means of travel. Bicycle touring is attractive for many reasons. Some of the most common reasons are; exploration of geographical and cultural differences, physical fitness, physical challenge, mental challenge, to meet new people, for recreation, to clear you head and for the sense of accomplishment.
HOW DO I KNOW IF I’M IN GOOD ENOUGH SHAPE?
The good news is that you don't need to be a super-athlete to enjoy it. The best thing to do is be realistic about what you can do and try to decide for yourself objectively. You'll want to test your limits in advance by trying the actual activity. Make time for test trips before you head out on your adventure. Work your way up to carrying the same gear you plan to tour with. To gauge your readiness, go on some day rides, with your gear, that are as far as you plan to ride during your tour days. If you can do back to back day rides that are longer than you are planning for your tour, and feel like you could ride again on the third day, you should be ready enough to "ride into shape" at the beginning of your tour. For more tips, check out our other How-To articles and features, like Getting in Shape for Touring.
HOW FAR CAN I RIDE IN ONE DAY?
This varies between people depending on their overall fitness, their personal goals, the style of touring they choose, and the terrain. However, here are some tips to plan by: With a bit of bicycle specific training, an average physically fit adult carrying less than 20 pounds of additional gear on their bike can expect to travel at an average pace of 65 miles per day and still have time to stop and smell the roses. With a load of gear totaling 20-45 pounds, the average pace to plan for should be lowered to 55 miles per day. If the terrain is particularly flat or mountainous, the average will increase or decrease accordingly. I recommend that you plan for at least one rest day out of ten. I do not recommended, carrying more than 45 pounds of gear. More experienced bicycle tourists can ride further, but for most people, planning to exceed these averages has a tendency to increase the physical challenge and decrease the enjoyment. Always plan time in your day, and days off in your trip, to accommodate unexpected challenges and good opportunities.
IS THE BIKE I HAVE SUFFICIENT FOR TOURING?
Three important characteristics of an appropriate bike for touring are durability, a comfortable riding position, and low gears. The abilities to mount racks, fenders, and wide tires (32 mm or greater) to the bicycle are also desirable. There are many different types of bicycles that can be used for touring. Experienced cyclotourists establish preferences, but there is no single style that is an overwhelming favorite. The decision is typically based on personal preference and the type touring (paved roads vs. dirt roads, amount of gear to carry, etc). Some bikes are specifically designed for touring. Most quality bicycles can be customized for touring use, with the exception of road racing bikes as they emphasize weight savings and quick handling over durability and comfort. To read a more on how to select a proper bike for touring, see Choosing a Touring Bike for the Road or the Touring Bike Buyer's Guide (March 2004).
HOW DO I FIND GOOD PLACES FOR BICYCLE TOURING?
Scenery, history and individual interests are popular reasons to pick a bicycle tour location. Keep in mind that many of the places you'd like to see by bicycle (such as a national park) are also popular destinations for many other kinds of visitors. In some cases, traffic and other variables create undesirable conditions for cyclists. This even happens in places you might not expect. This is not meant to scare you, but rather as something to research when selecting a location. There are many good resources for this kind of information. These include; Adventure Cycling's 36,180 mile National Bicycle Route Network of touring maps, state tourism agencies, state bicycle/pedestrian offices, and local bike clubs. City maps showing bicycle routes are becoming more available all the time. The contact information for these kinds of organizations can be found right here in the Cyclists' Yellow Pages. Internet searches are a good way to check for information about any given location that you can't find elsewhere, there are thousands of personal travelogues posed online.
HOW DO I CARRY MY GEAR IF I DON'T HAVE A CAR FOLLOWING?
Below are the two most common methods of carrying gear. Personal preference and other variables help people decide which one is best for them. Panniers -- Luggage that is designed to attach to your bicycle that you can carry your gear in. Panniers attach onto racks that sit over or next to the wheels. There are racks for this purpose available to fit nearly every bicycle. Trailer -- There are many types to choose from that are easy to attach and fit on most bicycles.
HOW DO I FIND INFORMATION ON WHERE TO STAY AT NIGHT?
Most states have a tourism agency that lists information about motels, campgrounds, B & B's and other forms of lodging. Chambers of commerce and convention and visitors associations are also good sources for this information. If you are touring on the National Bicycle Route Network, options are listed right on the maps.
IS IS SAFE TO TRAVEL AROUND AMERICA ALONE?
Yes. There is no reason to be afraid of the people you'll encounter in rural America. In fact, bicycle riders are typically perceived to be very non-threatening and often treated very warmly by strangers, especially during emergencies. The chances of something bad happening to you during a bicycle tour are likely to be no different than they are in your everyday life at home.
HOW MUCH MONEY DOES IT COST TO GO BICYCLE TOURING?
The cheapest way to go is to camp and cook your own meals. Assuming you have all the necessary gear before you leave, and you are touring in America, a budget of $35/day should be enough to pay for camping fees and groceries and still stash a bit away for unforeseen expenses like repairs or gear replacement. As with anything, the sky is the limit. Camping certainly isn't for everyone. Some people choose to increase their comfort level by spending more. You can choose to make the experience as comfortable or as adventurous as you like.
Larry Diskin has worked in the past as Events Coordinator in the Adventure Cycling Association Tours Department.
SELF-CONTAINED TOURING CHECKLIST -- Getting you ready for the road ahead.
Are you thinking of doing a self-contained tour this year? The demands placed on you and your bicycle by a multi-day tour are much greater than those encountered on a casual day ride – but the rewards are immeasurable! Use the following checklist to get ready.
60 DAYS BEFORE YOU GO
- If you haven’t already started, don’t wait any longer to begin training. Begin with rides of 20 miles or more on an unloaded bike, three times a week, working into longer day rides on the weekends. If weather or other circumstances prohibit this, use a wind trainer, stationary bicycle, or other form of exercise that taxes the cardiovascular system. Try to incorporate a couple days of loaded riding.
45 DAYS BEFORE YOU GO
- Continue your training rides, carrying lightly weighted panniers. Work up to 40 to 60-mile rides on at least one day each weekend, depending on the mileage you expect to do on your trip.
30 DAYS BEFORE YOU GO
- Make final purchases of clothing and equipment.
- Make certain that all repairs and maintenance, including lubrication, are made on your bike.
- Buy an extra pair of glasses or contacts and get a copy of your prescription.
- Continue your training rides, working up to 50 to 70-mile day rides on weekends. Seek out hills and varied terrain, attempting to simulate the type of riding you’ll encounter on your tour, and do some rides with fully loaded packs to test for proper weight distribution.
14 DAYS BEFORE YOU GO
- If you’re taking a long tour, make arrangements for paying any monthly bills coming due during your absence.
- Be certain you’ve used all your equipment and know how it works.
- Make all final adjustments to your bike.
- Continue training rides; try to do at least one overnight “shakedown” trip with a fully loaded bike. It’s better to discover and take care of problems before your tour begins.
- Pack your bike in a reinforced box and ship it, if it’s not traveling with you.
7 DAYS BEFORE YOU GO
- Pick up your travel tickets.
- Fill medical prescriptions to last longer than your trip.
- Cancel your newspaper delivery (don’t tell them when you plan to return).
- Change mail delivery or have mail held at the post office.
ADVENTURE CYCLING RULES OF THE ROAD - These guidelines are based on what Adventure Cycling has learned from actual on-the-road experience over the course of our thirty-plus years leading self-contained trips across and around the continent.
- A helmet (ANSI and/or Snell approved) should be worn while riding, both during the day’s ride and for any short trips from your overnight destination.
- Do not use headphones while riding.
- Obey traffic laws and ride safely. Ride single file, not two or more abreast.
- Whenever stopping, get at least 10 feet off the road. If there isn’t room to do this, ride on to a safer area.
- Don’t park bicycles against windows, gas pumps or near doorways.
- Never operate a stove on a table where people are sitting.
- Wash dishes at your campsite or in a designated “slop sink.” Do not wash dishes in restrooms, at pumps or at water taps. Soap should never be used in streams or lakes.
- Never take personal food into a restaurant.
So, now you have some tools to get you ready for the season!
I FEEL A TOUR COMIN’ ON - Several officers of our member clubs have expressed an interest in getting their clubs and club members more interested in touring. You want to provide more touring opportunities, but you aren’t sure how. Here are some suggestions for you.
 WINTER WEIGHT GAIN -- Strategies to fight the battle of the bulge.
by Nancy Clark, MS, RD
For those of us who live where the cold north wind blows frigid headwinds, dreaded winter is here again. Dreaded not only because of frozen toes, frostbitten cheeks, and slippery roads, but dreaded because of fear of winter weight gain. Finding enjoyable winter exercise that fits into your weight-management program can be a challenge for even the most dedicated cyclist. Just who gets excited about yet another boring indoor exercycling session? Somehow, baking cookies seems like more fun.
I commonly hear complaints about winter weight gain, such as, “I don’t bike as much in the winter and inevitably gain two to four pounds.” Because consistent overconsumption of only one hundred to two hundred extra daily calories can contribute to waistline expansion, we need to be careful when entertaining ourselves with those few extra Oreos, the second mug of hot cocoa, or the bigger bowl of popcorn munched in front of the TV.
If you are among the many cyclists who struggle with winter weight gain, here are three simple nutrition strategies that can save one hundred to two hundred calories per day — enough to make a difference in your battle of the bulge.
Strategy #1: Boost your calcium intake -- Calcium-rich diets are helpful not only for regulating blood pressure and keeping bones strong but also for weight management. A growing body of evidence indicates that consuming calcium- rich dairy foods three to four times a day equals burning about one hundred more calories of body fat per day — or about ten pounds of fat per year. In 1988, researchers were surprised and fascinated by the results of this blood-pressure study: subjects who ate two cups of yogurt per day not only lowered their blood pressure but also lost eleven pounds of fat in twelve months — even though they had been told to try to maintain weight! This finding triggered more research, and today we know:
 TEACH THE CHILDREN WELL -- Help to inspire the next generation of bicyclists!
Adventure Cycling is proud to help get kids "psyched on bikes" with our latest publication, Pedal Pioneers: A Guide to Bicycle Travel with Kids. Pedal Pioneers is a first-of-its kind, A-Z guide on how to organize youth bike trips for fitness, fun, and self-discovery. It is a perfect tool for clubs to help motivate the next generation of bicyclists.
Putting kids on a bike saddle gives them a sense of empowerment and more tools for success in life. Bicycling can be made accessible to almost every young person, and a two-wheeled adventure will give them a memorable experience that could turn them into committed cyclists for life. This is especially important since youth obesity levels have quadrupled in the last twenty-five years.
In five step-by-step sections and an exhaustive resource directory, Pedal Pioneers walks leaders through each stage of organizing a multi-day bicycle trip for kids who can bicycle independently. "Pedal Pioneers is a great step forward by Adventure Cycling to empower and educate leaders who already have the ‘want to’ by giving them the ‘know how,’" states Todd Murdock, who runs Talent Search from Cullowhee, North Carolina. "This book represents some of the best techniques and tips for bringing a youth cycle tour from wild idea to the road."
So if your bicycle club wants to be part of ensuring the health and wellness of future generations of bicyclists, get yourself a copy of Pedal Pioneers and start planning a life-changing experience for kids in your community.
As a member club, the Guide will only be $10.05 plus shipping and handling. It is $15.05 for non-members. To learn more about Pedal Pioneers, including some FAQs and how to get more kids bicycling, visit Pedal Pioneers Program.
GOING LIGHT: Ultralight Bicycle Travel for Your Next Adventure --  Panniers are great. Trailers too. But now there’s a new way to ride for days at a time by traveling lighter, simpler, and without all the heavy gear of traditional touring.
In the last decade, an ultralight ethos has revolutionized the backpacking world. Where hikers once labored into the backcountry with 40 pounds of gear or more, many now lithely walk with 15 pounds or less. This summer, Adventure Cycling decided to see how these gear breakthroughs could apply to cycling by testing them on a four-day backcountry mountain bike ride. They figured that if they could get their gear weight down to around 15 pounds, and travel without panniers or trailers, a whole new world of multi-day singletrack exploration and adventure would open for mountain bikers.
“It’s the next level of backcountry biking,” says Aaron Teasdale, deputy editor of Adventure Cyclist magazine, who rode the four-day trip with fifteen pounds of gear split between a backpack and an Old Man Mountain rear rack on a Santa Cruz Blur. “With this new gear and these new carrying strategies, adventurous mountain bikers can now ride long-distance singletrack for days at a time. On downhills, you don’t even know the extra gear is there.”
Road bikers win too. Nearly all the same gear and strategy breakthroughs carry over to pavement pedaling. If you’re traveling light, Adventure Cycling says, all of your gear can fit in a small set of front panniers, and ultralighters can do without panniers entirely. There’s nothing wrong with the traditional, heavily-laden style of bicycle travel, but by traveling with less weight the riding itself is easier and, most importantly, more fun.
“It’s liberating,” says Rod Kramer, tours director for Adventure Cycling and a recent ultralight convert. “There’s no need to feel like a pack-mule when you’re traveling by bike.” Kramer says Adventure Cycling is looking into offering ultralight-oriented guided trips in 2007, in addition to an Advanced Travel Seminar course that will focus on lightweight techniques.
To spread the word on this new style of bicycle travel, the August issue of Adventure Cyclist features a four-page ultralight gear feature, “Seeing the Light”, devoted to helping cyclists lighten their load. Adventure Cycling has also created a new section of their website — Ultralight Cycling — devoted to exploring the concept of lightweight bicycle travel. It contains gear ideas, tips, and resources, as well as a photo gallery from the four-day ride that took its riders on goat-path-like singletrack along spectacular mountain ridgelines.
“Why go home at night, when you can sleep under the stars and keep riding the next day?” says Teasdale. “With this new style of bike travel, the exploration and adventure potential is off the charts. I’m not sure what charts, but if anybody keeps adventure-potential charts, it’s way off those.”
- Inspire! If you have club members who have gone on a touring trip, let them share their photos and fun with your club.
- Start small. Plan a moderate paced, weekend trip. Use a local bike path system, trail network or just those quiet back roads. Map out a route, along with campgrounds or hotels and stops along the way. Don’t forget about plenty of food! A small trip like this can ease your group into things and get them excited about a longer trip in the future.
- Plan a touring vacation. Going on your first big tour with a group of strangers can be intimidating. Why not bring some of your closest cycling buddies along for the ride? Pick a tour together and sign up as a group. Touring with friends makes it that much more fun!
- Educate. Keep offering information, training ideas, and resources so that everyone feels more prepared and, therefore, more excited.
- Keep going. You may not immediately have your fellow club members clamoring to join you, but if you continue to share your enthusiasm and energy, it will be hard to resist. >/P>
-
- Calcium within the cell regulates fat storage.
- A high-calcium diet turns more calories to heat than to body fat.
- Calcium-rich diets contribute to fat loss in the stomach area.
- Calcium-rich diets can help minimize midlife fat gain.
- Eating three to four servings of calcium-rich dairy foods per day contributes to the beneficial effect of burning fat while preserving muscle. In a twelve-week weight loss study, those who ate three cups of yogurt per day lost sixty percent more fat than those who got calcium through supplements.
If you balk at the thought of consuming at least three servings of yogurt or milk per day, keep in mind it’s not very hard to do. Simply choose cereal with low-fat milk for breakfast (or cook hot cereal, such as oatmeal, in milk instead of water), have a low-fat yogurt for a mid-morning or evening snack, and enjoy a latté or hot cocoa made with low-fat milk for an afternoon energy booster. Other options include putting two slices (1.5 ounces) of low-fat cheese on a sandwich, and, yes, even drinking chocolate milk for a post-exercycle recovery drink. The weight-regulating trick is to be sure the dairy calories are within your daily calorie budget and not excessive. You cannot start to guzzle gallons of milk and expect to lose body fat!
People who don’t drink milk can get calcium from nondairy sources (broccoli, calcium-enriched orange juice, supplements), but calcium from dairy foods is most effective. For help with learning how to boost your calcium intake, consult a local sports dietitian ( will help you find one locally).
Strategy #2: Eat breakfast -- About forty percent of adults skip breakfast at least four times a week. Although skipping breakfast may seem like a good way to eliminate calories, breakfast skippers tend to be fatter than breakfast eaters. When people eat a larger-than-normal breakfast, they end up eating almost one hundred fewer calories by the end of the day, an amount that can curb creeping obesity. Hence, eating breakfast is one strategy that makes a big difference in weight management. In one group of dieters, each of whom has lost at least thirty pounds and kept the weight off for at least a year, ninety-seven percent are now committed breakfast eaters! They know that eating breakfast works!
Breakfast does not have to be eaten immediately upon rising, but it should be eaten within two to three hours of waking. If you can’t find time to eat breakfast at home, at least make plans to eat breakfast at the office.
Strategy #3: Eat more fiber and whole-grain foods -- Foods that are satiating (that is, they fill you to the point that you choose to stop eating) are rich in protein (turkey, tuna fish, chicken) or fiber (whole grains, fruits, vegetables, nuts). Given that protein often is accompanied by unhealthy saturated fat (as in cheese, bacon, hamburger), the wiser option is to curb hunger by filling up on fiber-rich foods.
Fiber-rich foods tend to be bulky, and bulk helps promote a feeling of fullness. That is, you can reduce the calorie content of a casserole by 30 percent by adding bulky vegetables (mushrooms, celery, peppers), and people will consume fewer calories without noticing the difference. According to Barbara Rolls, author of The Volumetrics Weight-Control Plan, consuming bulky foods with a high-fiber and water content can help you eat fewer calories. This means eating more fruit, vegetables, soup, beans, legumes, bran cereal, and whole grain cereals. These are more satisfying than a croissant with an equal number of calories.
Summary -- Whether you are motivated to fight winter weight gain or simply to fuel your body healthfully, eating a hearty, wholesome breakfast and consuming more calcium, fiber, and whole grains are wise nutrition strategies. Sounds like Wheaties is not only the breakfast of champions but also of lean cyclists!
"Winter Weight Gain" by Nancy Clark, MS/RD was originally published in the January/February 2004 issue of Adventure Cyclist magazine. Books by Nancy Clark include the Cyclists' Food Guide: Fueling for the Distance and the Sports Nutrition Guidebook. Both can be found at . Art Work for You -- Hear ye, hear ye! Adventure Cycling provides you with tons of great clip art and graphics. Use them for your website or newsletter. You can go to - - to find more today.